Sending requests
General information
The server for Pho.to API is located at http://opeapi.ws.pho.to. Pho.to API users can interact with the server via the HTTP and HTTPS protocols. The API is asynchronous and supports two types of HTTP(S) requests:
- POST requests for adding a task to the queue sent to http://opeapi.ws.pho.to/addtask/ (i.e. add task requests),
- GET requests for getting a result sent to http://opeapi.ws.pho.to/getresult/ (i.e. get result requests).
Add task request format
An add task request is a queued POST request with the following parameters (parameters format is given below in examples):
- APP_ID
- public key obtained at Developers.Pho.to
- KEY
- a private key obtained at Developers.Pho.to
- SIGN_DATA
- a request signature that can be generated as follows:
SIGN_DATA = hash_hmac('SHA1', DATA, KEY),
where DATA is a set of source images URLs and image processing methods with their parameters in XML format.
Here is a simple example of an add task request in UNIX:
curl -d 'app_id=APP_ID' -d 'sign_data=SIGN_DATA' -d 'data=DATA ' http://opeapi.ws.pho.to/addtask
XML structure of DATA
The XML structure of the DATA parameter in minimal form is as follows:
<image_process_call>
  <image_url>string</image_url>
  <methods_list>
    <method>
      <name>string</name>
    </method>
  </methods_list>
</image_process_call>
In this example the source image from the <image_url> tag is processed by the image processing method indicated in the <name> tag. Both image URL and method name are type of string.
The XML structure of the DATA parameter in the fullest possible form is as follows:
<image_process_call>
  <lang>xx</lang>
  <image_url order=”1” rect=”(x_left,y_top,x_right,y_bottom)” ... >string</image_url>
  <image_url order=”2” ...>string</image_url>
  <image_url order=”3” ...>string</image_url>
  …
  <image_url order=”k” ...>string</image_url>

  <methods_list>
    <method order=”1”>
      <name>string</name>
      <params>...</params>
    </method>
    <method order=”2”>
      <name>string</name>
      <params>...</params>
    </method>
    …
    <method order=”n”>
      <name>string</name>
      <params>...</params>
    </method>
  </methods_list>

  <result_format>format</result_format>
  <result_size>int_val</result_size>
  <result_quality>int_val</result_quality>
  <thumb_ini1_size>int_val</thumb_ini1_size>
  <thumb_ini1_quality>int_val</thumb_ini1_quality>
  <thumb_ini2_size>int_val</thumb_ini2_size>
  <thumb_ini2_quality>int_val</thumb_ini2_quality>
  <thumb_format>format</thumb_format>
  <thumb1_size>int_val</thumb1_size>
  <thumb1_quality>int_val</thumb1_quality>
  <thumb2_size>int_val</thumb2_size>
  <thumb2_quality>int_val</thumb2_quality>

  <animation_frames_count>int_val</animation_frames_count>
  <animation_speed_factor>int_val</animation_speed_factor>
  <animation_static_thumbs>bool_val</animation_static_thumbs>
  <watermark>
    url=http://… ;tl=(0.0,0.0);br=(0.1,0.1)
  </watermark>
  <template_watermark>bool_val</template_watermark>
</image_process_call>
string- the parameter should be type of stringint_val- the parameter should be type of positive integerbool_val- the parameter should be type of boolean (i.e. true or false)format- image format, for example "jpg", "png", "gif", "bmp".
DATA tags description
image_url
The image_url tag should contain a link (URL) to a source image in .jpg, .jpeg, .bmp, .png, .gif format
or to a .zip package with source images. This tag has the following attributes:
| Attribute | Description |
|---|---|
| order |
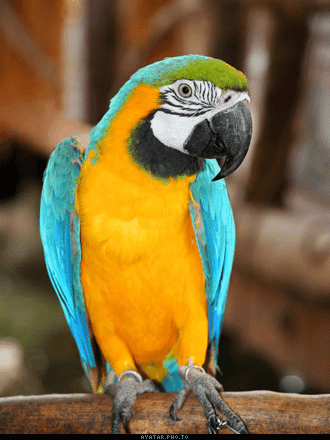
Order number of an input image. Each method takes a certain number of input images. Most methods take one input image, but some methods take multiple input images and the resulting image depends on their order. Any add task request can return only one resulting image. Formatted as: order="x" where x is the positive integer. The Example of order attribute usage: <image_url order="3">http://pho.to/parrot.jpg</image_url> |
| rect |
Rectangular area that is cropped from the source image. If this attribute is set, the source image from Formatted as: rect="(x_left,y_top,x_right,y_bottom)" To calculate the parameters of rect attribute put the upper left corner of the source image at the origin of an XY-coordinate system with one unit length equal to one pixel. Then find the coordinates of the rectangular area you want to crop from the source image: 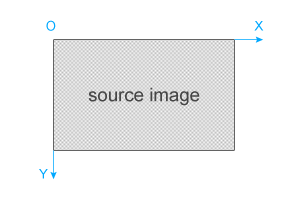
Example of rect attribute usage: <image_url rect="(50,70,450,670)">http://pho.to/parrot.jpg</image_url> |
| rotation |
Rotation of the source image by the specified angle. Formatted as: rotation="x.xx" where x.xx is the angle of rotation (a floating point number in the interval [0°..360°]). A source image is rotated clockwise around its centre point. The resulting image is cropped to maximum size without showing the background. The aspect ratio of a source image is preserved (see the picture below, the resulting image is colored blue). 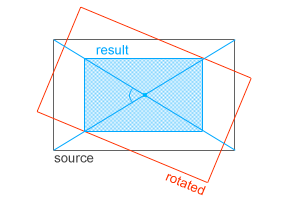
Example of rotation attribute usage: <image_url rotation=”15”>http://pho.to/parrot.jpg</image_url> |
| type |
Type of source image. By default there is no need to set this attribute and if it is not set then The only case when you need to set this attribute is when you input a .zip package containing source
images. Then it is formatted as: When you input multiple images for some method, transmitting a .zip package helps you to save the time. Example of type attribute usage: <image_url type="zip">http://ope-api.pho.to/pics/package.zip</image_url> |
| disabled |
Excluding specified images from a .zip package with source images. This attribute is used only with the Formatted as: disabled = "x1,x2,x3,..." where x1,x2,x3,... are the index numbers of images from a .zip package. Images in a .zip package are sorted by their names in alphabetical order and then indexed starting from 1. You should specify the indexes of images you want to exclude considering this sorting. This attribute is helpful when you use the same .zip package for several add task requests. Example: You've made a .zip package containing four images: cherry.jpg, apple.jpg, pear.jpg, peach.jpg. Let's sort images by their names in alphabetical order and index them starting from 1: 1) apple.jpg Now, let's exclude 'apple.jpg' and 'peach.jpg' images. Then the disabled attribute should look as follows: disabled="1,3" To avoid confusion, we recommend that you use only latin letters in images names. Example of disabled attribute usage: <image_url type=”zip” disabled="1,3">http://ope-api.pho.to/pics/package.zip</image_url> |
Examples of image_url tag usage
Example 1:
The simplest case, when only one image is transferred by its URL.
<image_url>http://pho.to/parrot.jpg</image_url>
Example 2:
Transferring five images. Cropping a rectangular area (0,0,400,600) from the second image.
<image_url order="1">http://pho.to/img/soft/ope/samples/8.jpg</image_url>
<image_url order="2" rect="(0,0,400,600)" >http://pho.to/img/soft/ope/samples/4.jpg</image_url>
<image_url order="3">http://pho.to/img/soft/ope/samples/2.jpg</image_url>
<image_url order="4">http://pho.to/img/soft/ope/samples/10.jpg</image_url>
<image_url order="5">http://pho.to/img/soft/ope/samples/17.jpg</image_url>
Example 3:
Transferring one image. Cropping a rectangular area (0,0,400,600) and rotating the image by 45 degrees clockwise. Cropping is done before rotating.
<image_url rect="(0,0,400,600)" rotation="45">http://pho.to/parrot.jpg</image_url>
Example 4:
Transferring a .zip package. Images with indexes 2 and 4 are excluded.
<image_url type="zip" disabled="2,4">http://ope-api.pho.to/pics/package.zip</image_url>
methods_list
methods_list tag specifies the sequence of image processing methods (filters) and their parameters in
the following format:
<method order="n">
  <name>method_name</name>
  <params>params_string</params>
</method>
where
method_name– method name;params_string– the string containing method parameters (if the string is absent, the default values are used).params_stringhas the following format:
param1=value1; param2=value2; ...; paramN=valueN
where param1 is parameter name, value1 is parameter value;
If a method has no parameters, the <params> tag can be skipped.
The full list of methods and their parameters.
The sequence of methods in an add task request looks as follows:
<methods_list>
  <method order="1">
    <name>method_name</name>
    <params>params_string</params>
  </method>
  ...
  <method order="n">
    <name>method_name</name>
    <params>params_string</params>
  </method>
</methods_list>
, where order is an index number of a method in a sequence (indexes start from 1). Methods are applied
to image(s) according to the order attribute value.
Examples of method_list tag usage
Example 1:
A simple method called 'desaturation' converts image into
black and white. This method has no parameters, so the <params> tag can be skipped. In this
example we will use only one method, so the order attribute can also be skipped.
<methods_list>
  <method>
    <name>desaturation</name>
  </method>
</methods_list>
Example 2:
The sequence of three methods ('desaturation', 'caricature', 'split_toning'). The methods are applied according to
the order attribute value (first 'desaturation', then 'split_toning', finally 'caricature').
<methods_list>
  <method order="1">
    <name>desaturation</name>
  </method>
  <method order="3">
    <name>caricature</name>
    <params>type=8;crop_portrait=true</params>
  </method>
  <method order="2">
    <name>split_toning</name>
    <params>desaturate=false;balance=48;shadow_hue=222;highlight_hue=44;shadow_saturation=100;highlight_saturation=94</params>
  </method>
</methods_list>
other DATA tags
| Tag | Default value | Description |
|---|---|---|
| lang | en | The language of the answer to The value of this tag is a two-letter language identifier from ISO 639-1 (http://en.wikipedia.org/wiki/List_of_ISO_639-1_codes). Available languages:
This tag specifies the language of error messages and the language of the pre-defined text in some templates that use the 'collage' method. Example of <lang>fr</lang> |
| result_format |
jpg for static gif for animated |
File format of the resulting image. Supported file formats:
Example of <result_format>png</result_format> |
| result_size | the size of the source image(s) |
Size of the resulting image. Defines the length of the longest side of a resulting image in pixels. Can only be less or equal to the length of the longest side of a source image. This tag can also be set in the Examples of 1) limit on the maximum dimension <result_size>256</result_size> 2) limit on both width and height; in fact, only one limit will be used as the aspect ratio remains unchanged <result_size>320x200</result_size> 3) limit on the width <result_size>640x</result_size> 4) limit on the height <result_size>x480</result_size> |
| result_quality | 90 |
Quality of the resulting image. The tag is only valid for resulting images in .jpg format. It defines the quality of resulting .jpg image on a scale of 0-100. It defines the quality of a resulting .jpg image on a scale of 0-100. If this tag is skipped, the original quality of a source image is preserved by default. Example of <result_quality>80</result_quality> |
| thumb_ini1_size | - |
Size of the first thumbnail of the source image. Pho.to API allows to generate 2 thumbnails of the source image. This tag defines the length of the longest side of the first thumbnail in pixels. Its value can only be less or equal to the width (height) of the source image. Like the This thumbnail image (in .jpg format) returns in response to an add task request. Example of <thumb_ini1_size>1024x</thumb_ini1_size> |
| thumb_ini1_quality | result_quality |
Quality of the first thumbnail of the source image. This tag is similar to the Example of <thumb_ini1_quality>95</thumb_ini1_quality> |
| thumb_ini2_size | - |
Size of the second thumbnail of the source image. This tag defines the length of the longest side of the second thumbnail in pixels and is similar to the
Like the This thumbnail image (in .jpg format) returns in response to an add task request. Example of <thumb_ini2_size>512</thumb_ini2_size> |
| thumb_ini2_quality | result_quality | Quality of the second thumbnail of the source image. This tag is similar to the Example of <thumb_ini2_quality>80</thumb_ini2_quality> |
| thumb_format | jpg | File format of the resulting image thumbnails (first and second thumbnails). This tag is only valid for static (non-animated) thumbnail images. Supported file formats: jpg, png, bmp, gif. Example of <thumb_format>bmp</thumb_format> |
| thumb1_size | - | Size of the first thumbnail of the resulting image. This tag defines the length of the longest side of the first thumbnail in pixels and is similar to the Its value can only bу less or equal to the value of Like the Example of <thumb1_size>150</thumb1_size> |
| thumb1_quality | result_quality | Quality of the first thumbnail of the resulting image. This tag is similar to the Example of <thumb1_quality>90</thumb1_quality> |
| thumb2_size | - | Size of the second thumbnail of the resulting image. This tag defines the length of the longest side of the second thumbnail in pixels and is similar to the
Its value can only bу less or equal to the value of Like the Example of <thumb2_size>300</thumb2_size> |
| thumb2_quality | result_quality | Quality of the second thumbnail of the resulting image. This tag is similar to the Example of <thumb2_quality>88</thumb2_quality> |
| animation_frames_count | 0 | Number of frames in an animated resulting image. This tag is only valid for animation effects. Example of <animation_frames_count>5</animation_frames_count> |
| animation_speed_factor | 0 | Level of resulting image animation slowing down or speeding up. This tag is only valid for animation effects. Integer number, whose negative value denotes animation slowing down, and positive value denotes animation speeding up. The value of 10 denotes 2-fold speedup. Example of <animation_speed_factor>8</animation_speed_factor> |
| animation_static_thumbs | false | Making static thumbnail for animation effects. This tag is only valid for animation effects. It defines whether or not to make static (non-animated) thumbnails for animation effects. Possible values:
Example of <animation_static_thumbs>true</animation_static_thumbs> |
| template_watermark | true | Presence of 'pho.to' watermark. Possible values:
If the value is false, the 'pho.to' watermark is removed from the resulting image in 'collage' and 'animated_effect' methods. Example of <template_watermark>false</template_watermark> |
| watermark |
Third-party watermark image. This tag allows adding a custom watermark image on the resulting image. Custom third-party watermark image should be accessible by an URL. Formatted as: url=IMAGE_LINK; tl=(x.xx, x.xx);tr=(x.xx, x.xx);bl=(x.xx, x.xx);br=(x.xx, x.xx);mid=(x.xx, x.xx) The image specified by The inscribing area may be defined by one or two of tl, tr, bl, br or mid points. The image specified by The inscribing area can be defined by one or two of tl, tr, bl, br or mid points. 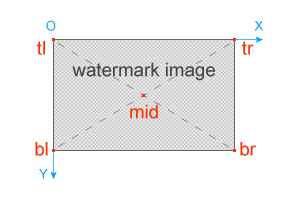
To calculate these points, put the upper left corner of the source image at the origin of an XY-coordinate system. The coordinates of the points (x.xx) are defined with a value from 0.00 to 1.00 and are measured in the parts of corresponding resulting image side size. In case only one point is specified, the size of the watermark image does not change. If two points are specified, the watermark image is resized according to a specified rectangle. For example, you can set only the upper left (tl) and lower right (br) points. Example of watermark tag usage: <watermark>url=http://ope-api.pho.to/pics/sample_watermark.png; tl=(0.8, 0.85);br=(0.9, 0.95)</watermark> |
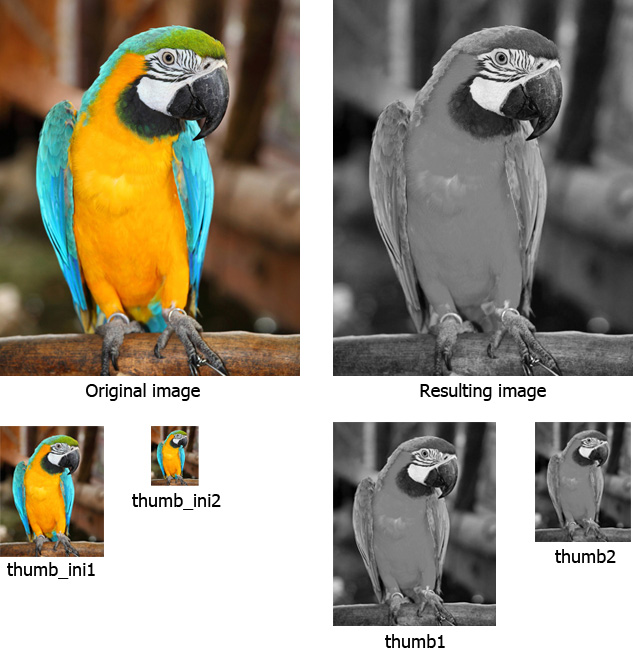
The illustration below shows all images that can be produced from a source image:
- thumb_ini1
- thumb_ini2
- resulting image
- thumb1
- thumb2
Small thumbnails are useful when you need to show small previews on your website / in an app.
Examples of other DATA tags usage
Examples below show only tags usage, they are not full add task requests.
Example 1:
Here we generate one thumbnail of the source image, get the resulting image in .png format and get two thumbnails of
the resulting image. The result_quality tag is not set, because the resulting image is in .png format
(not .jpg).
<result_format>png</result_format>
<result_size>700</result_size>
<thumb_ini1_size>120</thumb_ini1_size>
<thumb_ini1_quality>75</thumb_ini1_quality>
<thumb_format>png</thumb_format>
<thumb1_size>400</thumb1_size>
<thumb1_quality>90</thumb1_quality>
<thumb2_size>80</thumb2_size>
<thumb2_quality>75</thumb2_quality>
Example 2:
In this case, we set:
- the width and the height of the resulting image (width is less or equal to 700 px, height is less or equal to 600 px);
- the width of the first thumbnail of the source image (it is less or equal to 300 px);
- the height of the first thumbnail of the resulting image (it is less or equal to 350 px).
<result_format>png</result_format>
<result_size>700x600</result_size>
<thumb_ini1_size>300x</thumb_ini1_size>
<thumb1_size>x350</thumb1_size>
Example 3:
Here we use the ‘animated_waterflow’ animation method, get the resulting image in .gif format, set the number of frames and speed factor and get a static thumbnail. Also, we add a custom watermark to the resulting image.
<watermark>url=http://ope-api.pho.to/pics/sample_watermark.png; tl=(0.9, 0.95);br=(1.0, 1.0)</watermark>
<methods_list>
  <method order="1">
    <name>animated_waterflow</name>
  </method>
</methods_list>

<result_format>gif</result_format>
<result_size>400</result_size>
<animation_frames_count>10</animation_frames_count>
<animation_speed_factor>0</animation_speed_factor>
<animation_static_thumbs>true</animation_static_thumbs>
Examples of full add task requests
Example 1:
In this case, we edit the source image performing the following steps:
- denoising;
- shadow/highlight adjustment;
- color temperature correction.
We get the resulting image in .png format (600 pixels limit for the longest side). We also get one thumbnail of the source image and two thumbnails of the resulting image.
Request examples
Examples
In this case, we edit the source image performing the following steps:
- denoising;
- shadow/highlight adjustment;
- color temperature correction.
We get the resulting image in .png format (600 pixels limit for the longest side). We also get one thumbnail of the source image and two thumbnails of the resulting image.
<image_process_call>
<image_url>http://pho.to/img/soft/ope/samples/4.jpg</image_url>

<methods_list>
<method order="1">
     <name>denoising</name>
     <params></params>
</method>
<method order="2">
     <name>shadow_highlight</name>
     <params>shadow_factor=4;highlight_factor=4</params>
 </method>
 <method order="3">
     <name>color_temperature</name>
     <params></params>
 </method>
</methods_list>

<result_format>png</result_format>
<result_size>600</result_size>

<thumb_ini1_size>50</thumb_ini1_size>
<thumb_ini1_quality>70</thumb_ini1_quality>

<thumb_format>jpg</thumb_format>
<thumb1_size>100</thumb1_size>
<thumb1_quality>70</thumb1_quality>
<thumb2_size>50</thumb2_size>
<thumb2_quality>70</thumb2_quality>

</image_process_call>
Before
After

Thumb_ini1
Thumb1

Thumb2
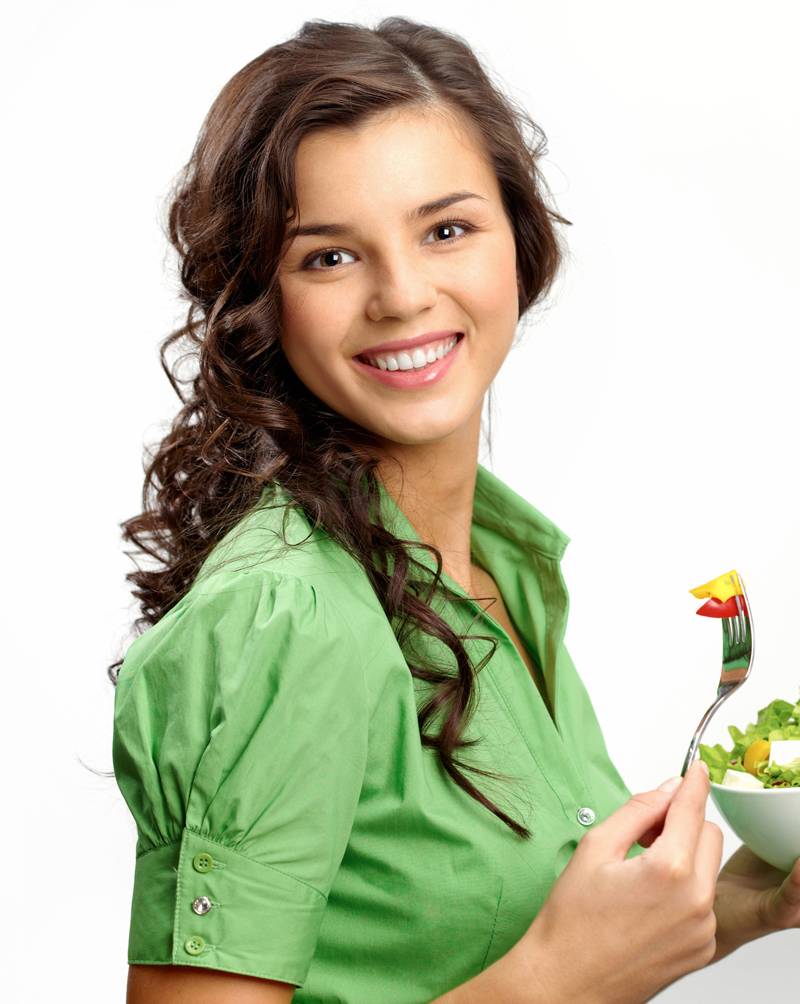
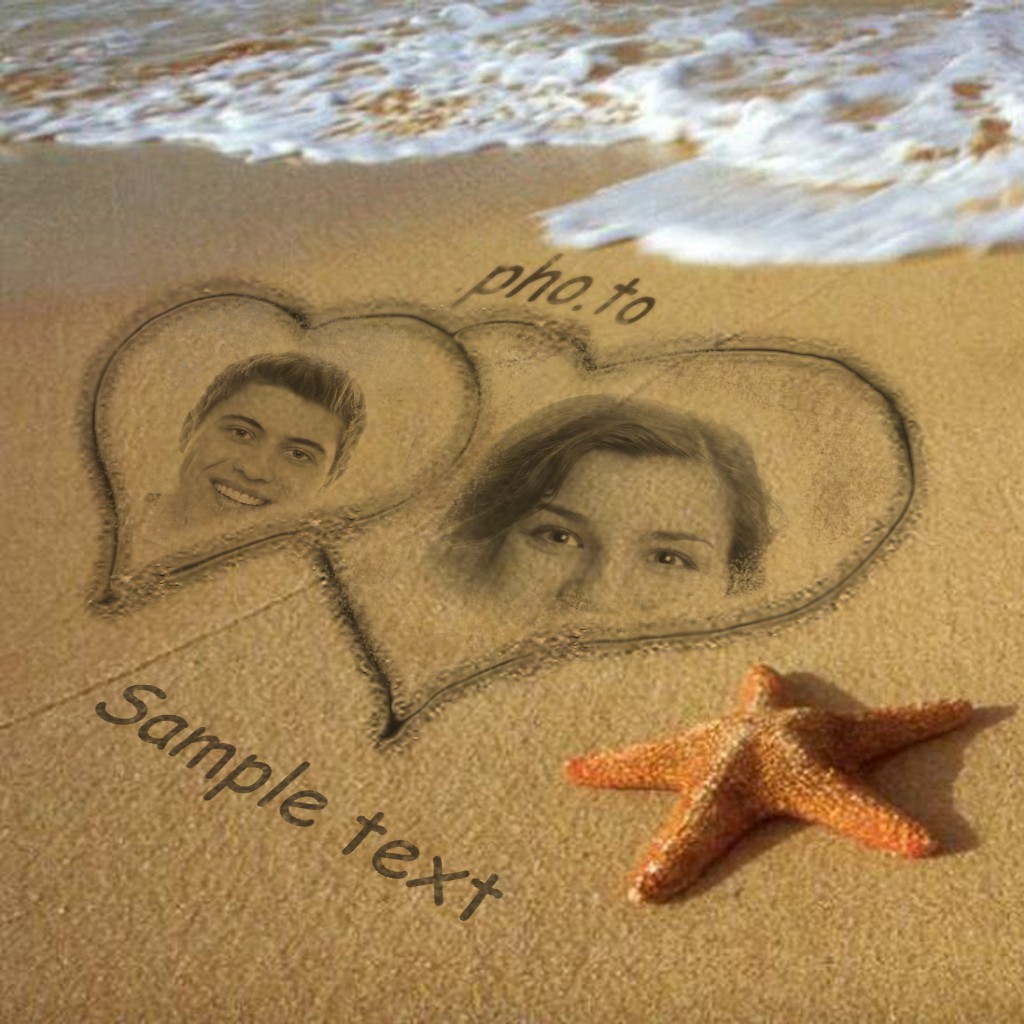
Here we insert two source images into the http://funny.pho.to/summer_love/
template and add custom text to the resulting image (adding custom text is one of ‘collage’ method
parameters). “U2FtcGxlIHRleHQ=” is a base64-encoded “Sample text” string.
We crop the face area from the source images and also rotate the second source image by 5 degrees.
We also add a 'pho.to' watermark to the resulting image.
<image_process_call>
<image_url order="1" rect="(111,41,648,718)" >https://dl.dropbox.com/u/35054895/del/test/boy.jpg</image_url>
<image_url order="2"  rect="(134,10,597,385)"  rotation=”5”>https://dl.dropbox.com/u/35054895/del/test/girl.jpg</image_url>
<methods_list>
<method order="1">
   <name>collage</name>
   <params>template_name=Summer Love;text=U2FtcGxlIHRleHQ=
   </params>
</method>
</methods_list>
<template_watermark>true</template_watermark>
</image_process_call>
Before
Before
After
Here we transfer a .zip package with source photos for inserting them into the http://funny.pho.to/post_stamps template. This template allows multiple images to be uploaded, that’s why we use a package. Experiment with the disabled attribute to better understand how it works.
<image_process_call>
<image_url type="zip" disabled="1">https://dl.dropbox.com/u/35054895/del/test/test.zip</image_url>
<methods_list>
<method order="1">
   <name>collage</name>
   <params>template_name=Post Stamps</params>
</method>
</methods_list>
<template_watermark>false</template_watermark>
</image_process_call>
-

After
Here we crop a rectangular area containing the face from the source photo and apply the 'blinking' animated effect to it. We also set the number of frames and animation speed.
<image_process_call>
<image_url>https://dl.dropbox.com/u/35054895/my/parrot/parrot2.jpg</image_url>
<methods_list>
<method>
   <name>animated_effect</name>
   <params>template_name=blinking</params>
</method>
</methods_list>
<animation_frames_count>5</animation_frames_count>
<animation_speed_factor>10</animation_speed_factor>
</image_process_call>
-

Before
-
After
